Continue a Pattern of Dates in Excel
No matter how many or few dates you need, the whole day/month/year thing can be annoying to do even if it is just a few times. Today we learn about auto-filling dates in Excel. Why would anyone need so many dates? It could be for a calculation on daily wages, it could be for a dated column in payroll, it could be an attendance sheet, daily sales entry, you get the idea. If you're thinking that most of these examples can't rely on a date sequence since weekends would need to be deducted, you're right and we're prepared. That's where the weekday sequence comes in.
By the end of this tutorial, you will learn how to autofill dates using the in-front-of-your-eyes Fill Handle, Series settings, and the SEQUENCE function. We will also fill you in on auto-filling weekdays, months, and years. If the daily fill isn't what you're looking for, we will also show you how to auto-fill alternate days, every 2 days, 3 days, etc.
Yes, this guide is about auto-fill but you need to give auto-filling some direction; the first date needs to be entered manually and we have a few things we need to say about that so let's take a nosedive and begin.

Entering the First Date
The first date for the sequence will have to be entered manually. Here are some tips on getting it right:
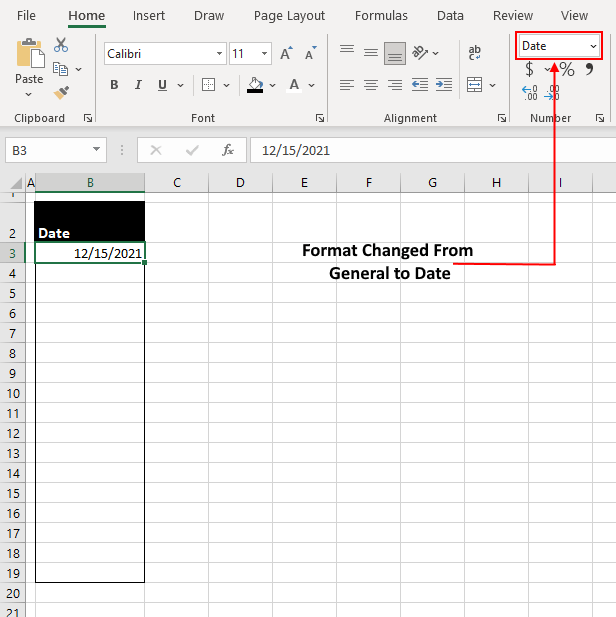
If you enter the date month-first with hyphens or forward slashes, Excel will recognize the entry as a date and change the format of the cell from General to Date. You know the entry has been recognized as a date when it self-aligns to the right of the cell.
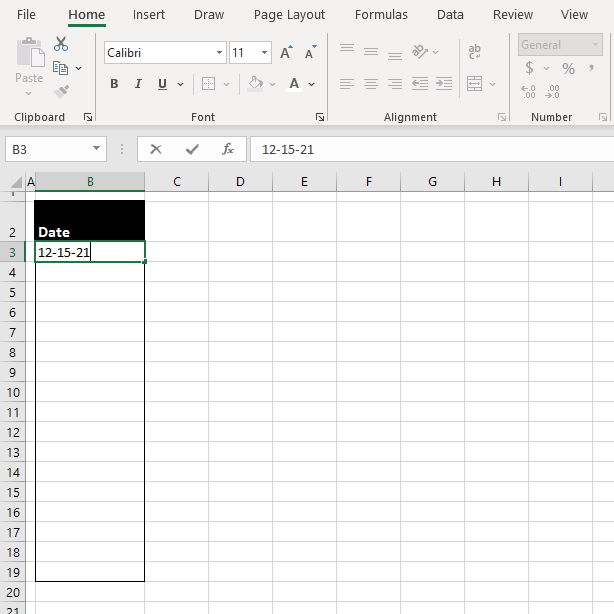
If the entry is not recognized as a date, you can press Ctrl + 1 to access the Format Cells dialog box. From here, you can format the cell into the Date format and also choose the specific format from the options (such as 15-Dec-21 or 15/12/21).
Autofill Sequential Dates in Excel Using the Fill Handle
Sequential dates can be auto-filled using the Fill Handle. It's super easy as you can quickly fill a range of cells with a date sequence, a convenience you probably have used many times before with or without realizing. But before jumping to the steps let's get ourselves accustomed with the Fill Handle.
What is Fill Handle?
The Fill Handle is a tiny square at the bottom right corner of the active cell(s).

When hovered over the Fill Handle, the cursor will change to a black cross sign. That is the cue to click and drag the Fill Handle down to the cells you want to fill.
As you drag, a callout bubble on the side of your selection will keep notifying you of the content of the last auto-filled cell.
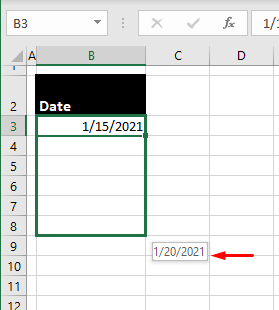
You can use this callout bubble to get an idea of which cell you want to drag up to.
Alright, with the basics out of our way, let's see the steps:
- Enter the first date manually. For tips, refer to the segment on Entering the First Date
- Select the cell with the date.
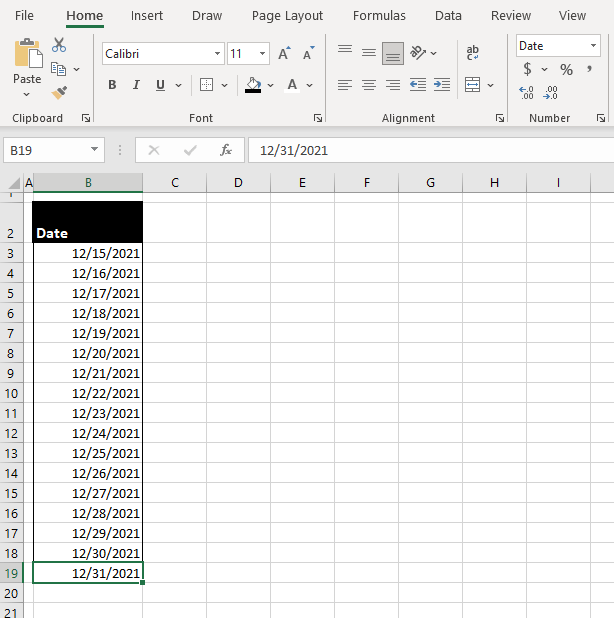
- Click and drag the Fill Handle. We want the dates up to 31st December. We can use the callout bubble notification on the side of our selection to see which cell we need to drag to.
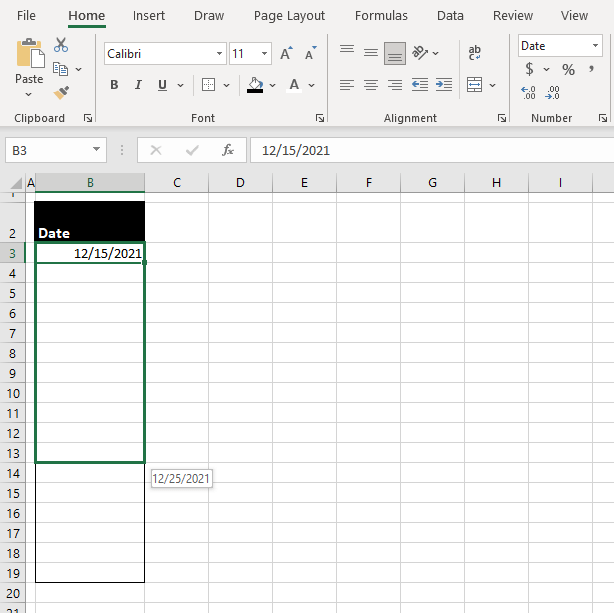
- Clicked and dragged, the dates will be auto-filled according to the format of the first date:
Autofill Dates With the Series Dialog
A sequence of dates can be auto-filled using the settings from the Series dialog. For a quick autofill, the Fill Handle option above is the best pick but for some tinkering with the settings, the Series dialog offers a handful of options and can be used to autofill dates, months, years, and weekdays as you will find later. Below are the steps to autofill dates using the Series dialog:
- Manually enter the first date. For tips, refer to the segment on Entering the First Date
- Select the cell. Right-click and drag the Fill Handle.
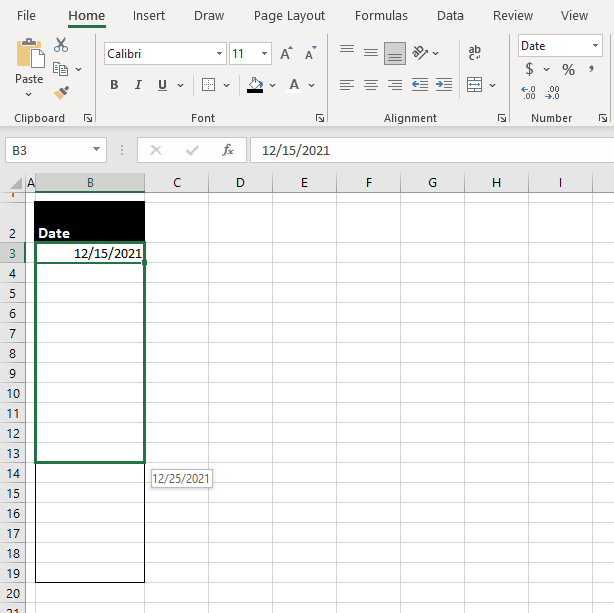
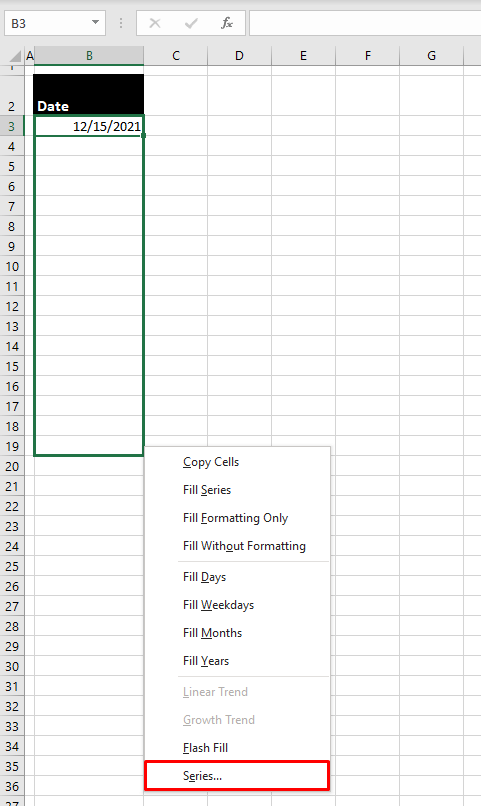
- When you release the right-click mouse button, you will see a context menu.
- Select the last action Series… to open the Series dialog box.
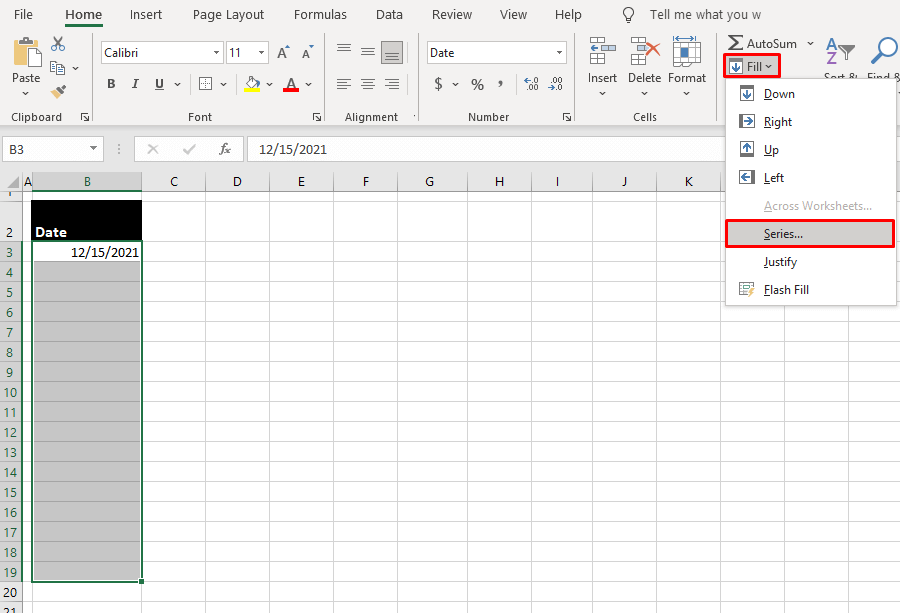
- The Series dialog box can also be accessed by the Fill button in the Home tab in the Editing group. Select the range of cells to fill, go to the Fill button and select the Series… option.
- In the Series dialog box, the settings below will be detected from your selection. Make any adjustments if required then click OK.

- And that will enter a sequence of dates for you.

In the Series dialog box, you may have noted various options and that should help you with entering other series. E.g. if you need a date sequence of alternate days, you could set the Steps as 2 instead of 1 in the Series dialog box.

Here are the results:

Now that was dates; in the Series dialog, there are more options that will autofill months, years, and weekdays too which is what our following segments are about.
Autofill Months in Excel Using the Fill Handle/Series Dialog
Like days, you can autofill months in Excel. For month names alone, the Fill Handle will be the quickest. For full dates with a month sequence, we will show you how to autofill using both the Fill Handle and the Series dialog.
Autofill Month Names Using the Fill Handle
- Enter the first month's name manually.

- Select the cell with the month name. Click and drag. As you drag, a callout bubble on the side of your selection will keep notifying you of the content of the last auto-filled cell. Use this callout bubble to determine your destination cell. E.g. we will drag down until we see December.

- Clicked and dragged, the months will be auto-filled to the dragged cells:

Autofill Month Sequence Using the Fill Handle
These are the steps to autofill the months in full date format using the Fill Handle. It's like auto-filling dates but the sequence will be of the months, keeping the date constant. Here's how to do it:
- Enter the starting date. For tips, refer to the segment on Entering the First Date

- Select the cell with the date. Click and drag the Fill Handle down to the cells you want to fill. The dates will be auto-filled based on the format of the first date:

- As you can see, this is a sequential date fill, which is not what we wanted. So, click on the Auto Fill Options icon highlighted above at the bottom-right of your selection. From the list, select the Fill Months option.

- And now you can see that the date 15 has remained constant while the months have changed in sequence:

Autofill Month Sequence Using the Series Dialog
Now we look into auto-filling the months in full date format using the Series dialog which is just like auto-filling dates but the sequence will be of the months, keeping the date constant. Here's how to do it:
- Enter the first date manually. For tips, refer to the segment on Entering the First Date

- Select the cell with the date. Right-click and drag the Fill Handle down to the cells you want to fill. When you release the right-click mouse button, a context menu will appear.
- Select the last option Series… to access the Series dialog box.

- In the dialog box, select the Month radio button. Then click OK.

- Following the steps above, the date 15 has remained constant while the months have changed in sequence:

Autofill Years in Excel Using the Fill Handle/Series Dialog
Like days, you can autofill years in Excel. For years on their own, the Fill Handle makes for the easiest way. For full dates with a year series, we will show you how to autofill using both the Fill Handle and the Series settings.
Autofill Year Using the Fill Handle
- Enter the first 2 years.

- With both cells selected, click and drag the Fill Handle down to the cells you want to fill. While dragging you can take help of the callout bubble to determine the destination of the fill.

- That should autofill the years:

Autofill Year Sequence Using the Fill Handle
Now we will autofill the years in full date format with the Fill Handle. Auto-filling years keeps the date and month constant with a year's series. Find out how, below:
- Enter the starting date manually. For tips, refer to the segment on Entering the First Date

- With the cell selected, click and drag the Fill Handle to the number of dates you want. Following the format of the starting date, the dates autofill like this:

Note that these are auto-filled dates, which is not what we're looking for right now. To change this into a year sequence, click on the Auto Fill Options icon highlighted above at the bottom-right of the selection and select the Fill Years action.

Now the date and month (15/1) have remained constant while the years are in sequence:

Autofill Year Sequence Using the Series Dialog
Using the Series dialog, here are the steps to autofill the years in full date format with the years in sequence and the date and month constant. Follow below:
- Enter the first date. For tips, refer to the segment on Entering the First Date

- Select the cell with the date. Right-click and drag the Fill Handle down to the cells you want to fill. Upon releasing the right-click mouse button, there will be a context menu.
- Select Series…from the list.

- In the launched Series dialog box, select the Year radio button.
- Then click OK.

With the date and month 15/1 constant, there we have a series in years:

Recommended Reading: How to Sort by Date in Excel
Autofill Weekdays in Excel Using the Fill Handle/Series Dialog
Like dates, weekdays can be auto-filled in Excel. For weekday names, the Fill Handle provides a quick solution. For weekday dates in sequence, we will show you how to use both the Fill Handle and the Series dialog to autofill the dates.
Autofill Weekdays Using the Fill Handle
- Enter the first weekday.

- Select cells, right-click and drag the Fill Handle down to the cells you want to fill. While dragging, the callout bubble on the side of the selection can help with the autofill.

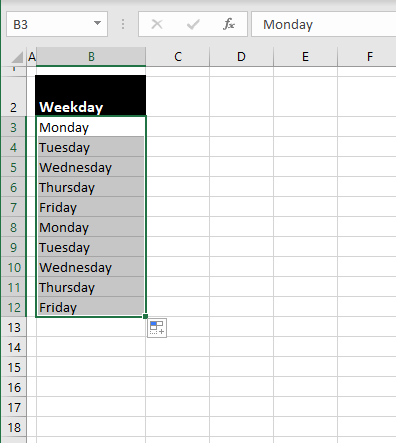
- The weekdays get auto-filled in this way:

If you only need weekdays (without the weekends), just click on the Auto Fill Options icon highlighted above at the bottom-right of your selection. From the list, select the Fill Weekdays

Now you have just the weekdays in sequence:
Autofill Weekday Sequence Using the Fill Handle
Now we move on to auto-filling the weekdays in full date format using the Fill Handle. It's like auto-filling dates but the sequence will be only of the weekday dates, not weekends. For reference, we will make a weekday name column so you can see which days are being listed. See the steps for auto-filling weekday dates below:
- Enter the first date manually. For tips, refer to the segment on Entering the First Date
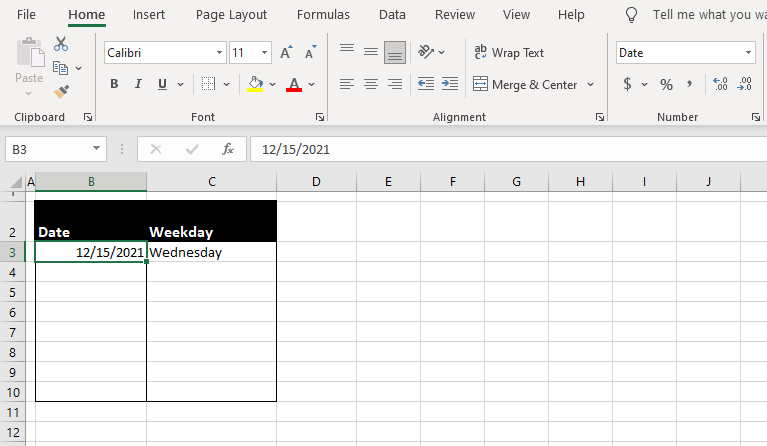
- Select the cell with the date. Click and drag the Fill Handle down to autofill the dates.
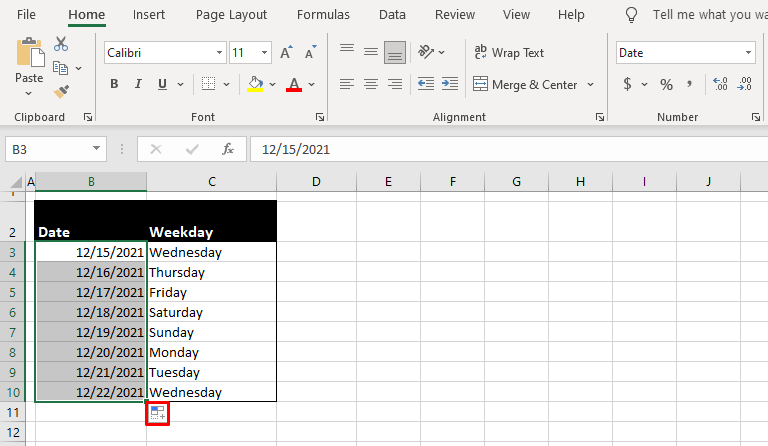
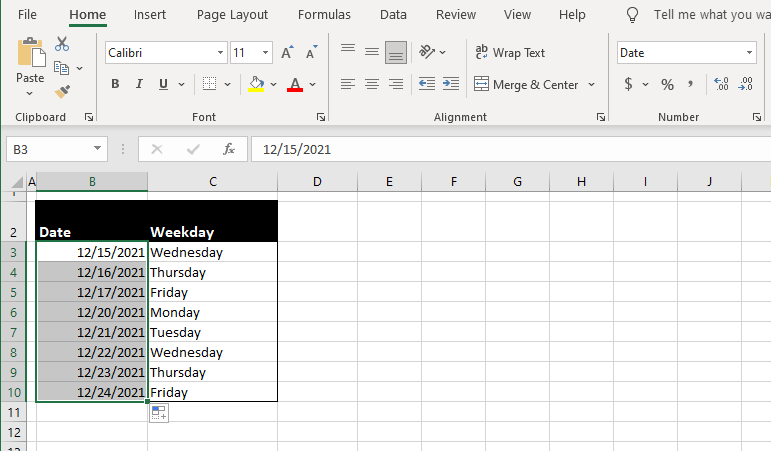
The autofill above includes weekends which is what we are aiming to leave out. For that, click on the icon highlighted above at the bottom-right of your selection: Auto Fill Options. From the list, select the Fill Weekdays option.
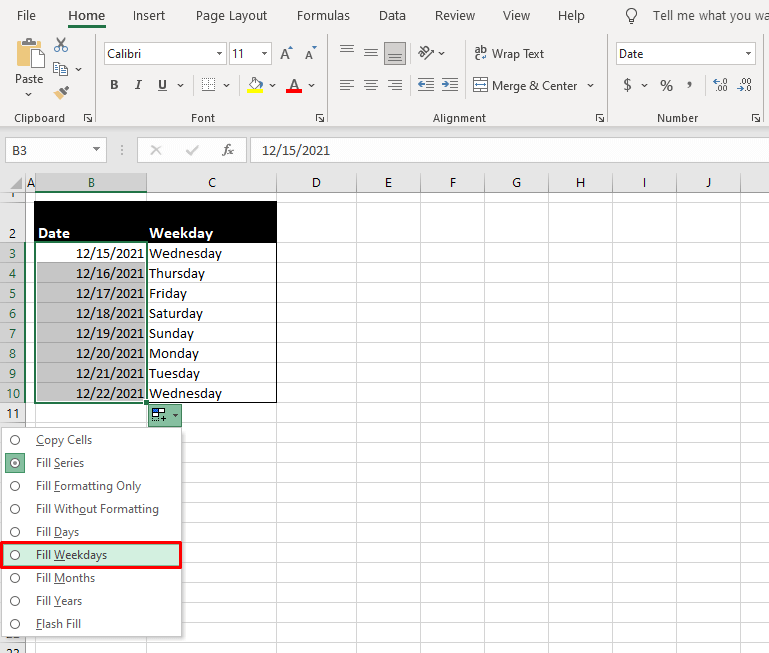
Now the weekends have been removed from the sequence leaving only the weekdays:
Autofill Weekday Sequence Using the Series Dialog
The second method of auto-filling the weekdays in full date format uses the Series dialog. The sequence will include weekday dates, not weekends. We will also keep a weekday name column for referral to show you which days will be auto-filled. Here's how to do it:
- Enter the first date manually. For tips, refer to the segment on Entering the First Date

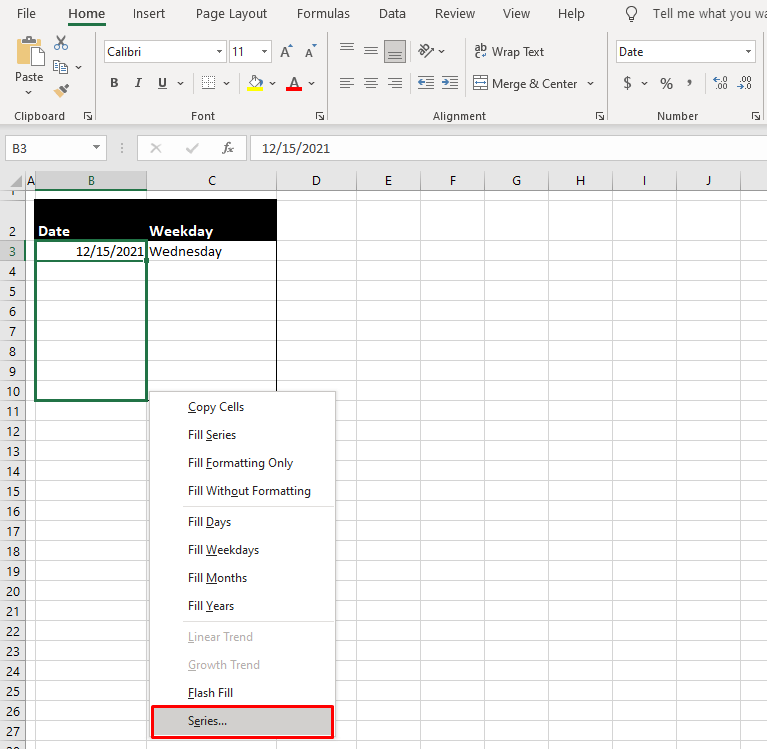
- Select the cell with the date, right-click and drag the Fill Handle down to the number of dates you want. Release the right-click mouse button to have a context menu appear.
- Select the last action Series… to launch the Series dialog box.
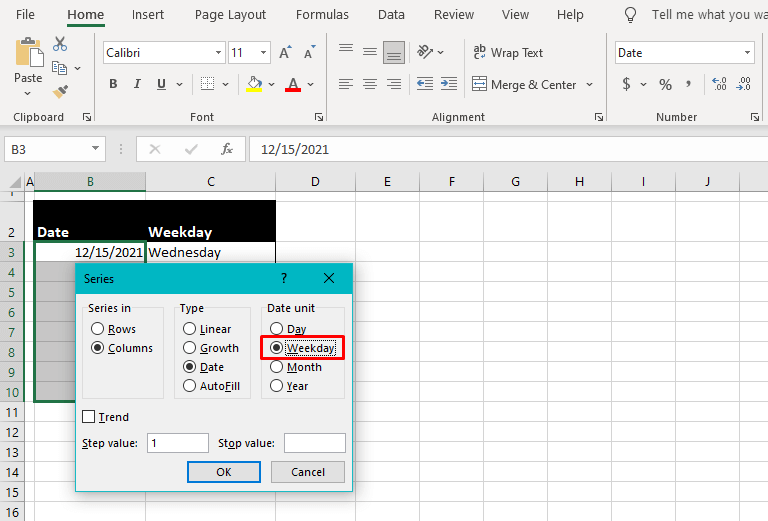
- In the dialog box, select the Weekday radio button.
- Then click OK.
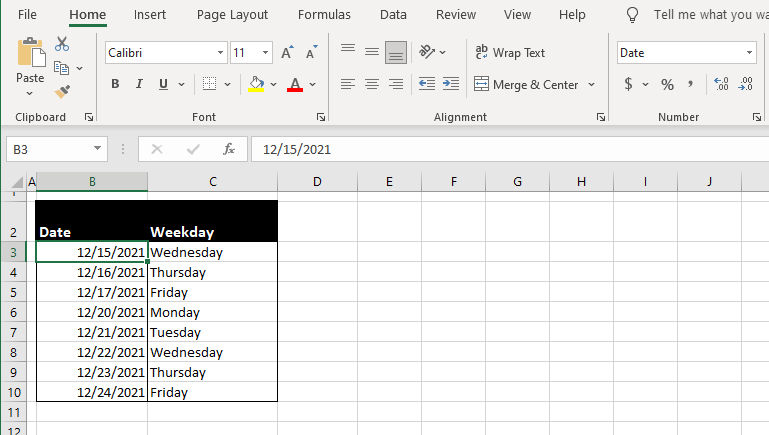
These steps will leave the weekday dates, removing the weekend dates:
Auto-Populate Dates in Excel with SEQUENCE Function
And last but not least, we couldn't wrap up a detailed guide without a function. Dates in Excel can be auto-populated using the SEQUENCE function. The SEQUENCE function returns a sequence of numbers according to the arguments fed in the function (the number of rows & columns, the starting value, and the steps). Let's see how we can use it here.
This is the formula we will apply for a regular sequence of dates:
= SEQUENCE(17,1,D3,1)
Here is the formula applied:
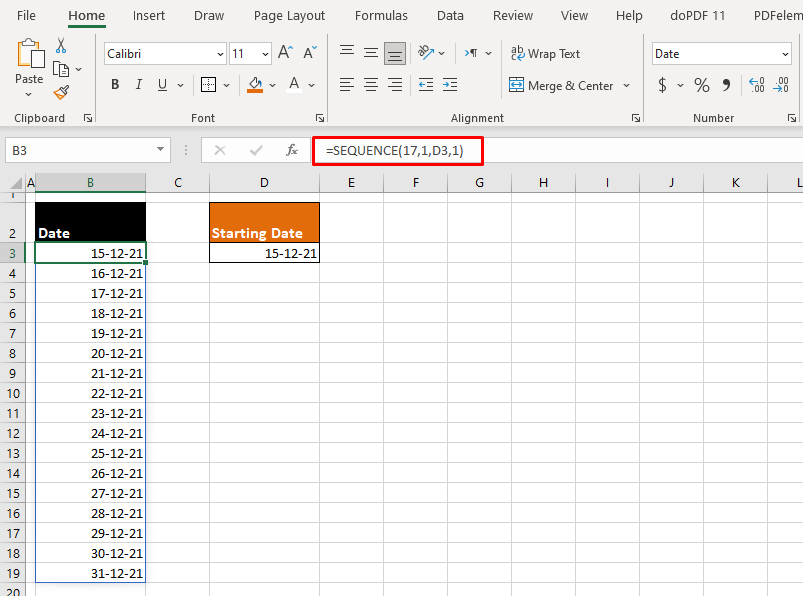
We needed 17 dates from December 15th to December 31st so we have entered 17 into the function as the number of rows we need in the sequence. 1 is the number of columns. D3 is the start of the sequence and since we need sequential dates, we have entered the starting value as a date reference. The last 1 is the number of steps. If you wanted alternate dates, you can put 2 instead of 1 here and so on so forth.
The result of the function is a spill, as you can see from the blue border surrounding the result. This means you do not need to drag and fill the formula; it will be auto-filled.
Talking of spilling, we have spilled all our beans on auto-filling dates in Excel. Next time you're stuck with filling out a series, try one of the methods above to get your work flowing in a jiffy. We have so much more to kick your work in gear so keep heading back because let's be real, all that Excel knowledge is not going to autofill itself!
Source: https://exceltrick.com/how_to/autofill-dates-in-excel/
Post a Comment for "Continue a Pattern of Dates in Excel"